

I’ve been playing around with my TinyPilot KVM ( https://tinypilotkvm.com/ ) for a few weeks now and I have been very impressed with what this tiny device can do.
Let’s say you have your TinyPilot KVM plugged in to a computer or device where you want to Install Windows from a bare metal scenario (i.e., no current OS on the disk or current OS is corrupt) Can that be done ?
There are many ways of Installing Windows, for most home users it will probably be with a bootable USB or DVD. For Enterprises or SMBs where you need to Install windows in a more automated way over the network you might use PXE-boot together Microsoft Deployment Toolkit (MDT) or Configuration Manager (ConfigMgr).
The list of options are long and different approaches is determined by your needs.
However, in this article I will cover one of the simpler methods for Installing Windows with TinyPilot KVM and using the virtual media option with its current limitations.
One of the limitations right now is that the TinyPilot KVM can’t Install Windows because the ISO for a full installation of Windows is around 5GB. TinyPilot emulates a CD-rom which has a limit of 2.2GB so one option is to split up your ISO installation into smaller chunks files which are less than 2.2 GB.
Personally, I like the approach I will describe here in this post where we will leverage WinPE (Windows Preinstallation Environment) to boot the machine with and from there execute the Windows Installation over the network within WinPE.
https://learn.microsoft.com/en-us/windows-hardware/manufacture/desktop/winpe-intro?view=windows-10
WinPE is a lightweight windows environment from Microsoft that gives us some basic functionality from which we can then start the full Windows Installation. And since WinPE usually is around 400MB it’s no problem mounting it as a virtual media through the TinyPilot KVM.
All the tools used from Microsoft are free and available for anyone to use. To use the Virtual media function with TinyPilot you need the Pro license which either comes with your device (12 months) or as a separate licensen you can buy. https://tinypilotkvm.com/product/tinypilot-pro
Downloading and Installing Windows ADK
First step is to download the Microsoft Assessments and Deployment toolkit (Windows ADK). For this we will be using the latest ADK, there are some edge cases where you might need to use an older version of the ADK but most likely the latest one is always the safest bet.
https://learn.microsoft.com/en-us/windows-hardware/get-started/adk-install
There are 2 parts that we need to download and install, first is the Windows ADK and then the Windows PE add-on which contains the boot image.

Once downloaded you can just run the installation for both of them.

Creating our WinPE ISO
Once you have Installed the ADK and the Add-on you need to run the “Deployment and Imaging Tools Environment” you can just search for it on your computer like this

you can also find it here: “C:\ProgramData\Microsoft\Windows\Start Menu\Programs\Windows Kits\Windows ADK”
copype amd64 C:\temp\WinPEMake sure the folder does not already exist. If the folder already exist, you will get this error message:

If everything goes as planned, you should see the Success prompt and 3 folders will show up in the location you selected.


To create our WinPE.ISO we run the following command
makewinpemedia /iso C:\temp\WinPE C:\temp\WinPE\WinPE.iso
Once we have our WinPE.ISO which will be our bootable media we can head over to the TinyPilot interface.
Adding your boot Image to Virtual Media
In your TinyPilot view, go to -> System -> virtual Media
Then click on “Add disk Image” and select “From Computer“
Navigate to the folder location where the WinPE.ISO is located and select it and wait for the transfer to finish.


Once the ISO file has been uploaded to your TinyPilot, click on Actions -> Show Options and select the Mount mode to be CD-ROM. And then click on “Mount”


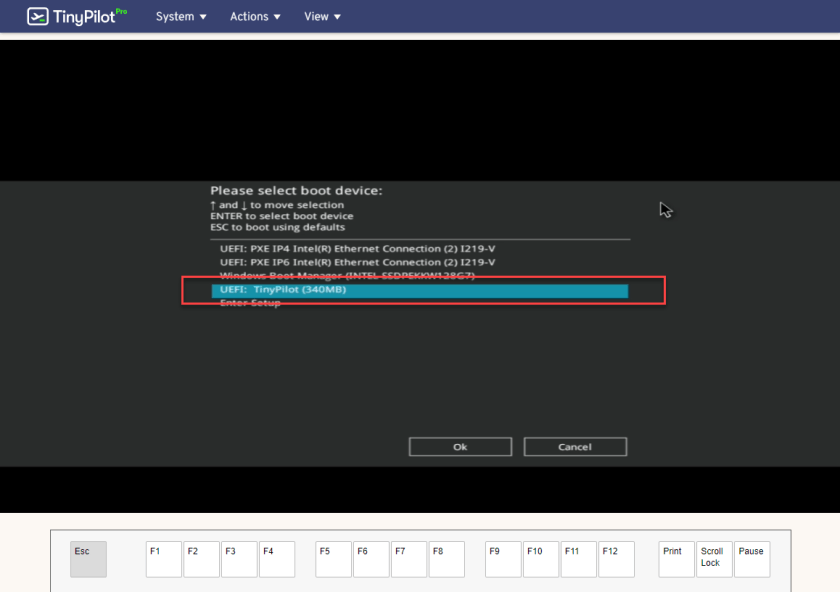
Boot your device using the Virtual Media
On your device that’s connected to your TinyPilot, change the boot order or select a temporary boot order selction to “TinyPilot“. On most PC’s today you can press F8 or F12 during POST. When the device restarts press any key on the keyboard to boot from the CD-ROM.ipco

Once your device has booted with the help of our new boot device you will enter the WinPE envirorment that looks like this:

The first thing to check for is to make sure that you have a network connection, the easiest way of doing this it to just typ IPCONFIG in the command window. If you have an IP-adress and DHCP turned on you should get an IP-adress.


If you for some reason don’t get an IP-adress and the list is all empty this often means that there is no functional network driver. Follow the steps described in the section below for adding drivers in to your WinPE.ISO

Drivers (Optional)
You might end up in a situationen where you need to have additional network drivers to be able to get the network working and retrieve an IP-adress.
As in previous step we need to create our WinPE.ISO and on top of that we needto inject the network driver with the help of DISM. But first we need to download the correct driver or figure out which one we need, this is often pretty straight forward. Easiest method is just to go to the manufacturers website and download the Network driver. For this specific computer I had to go to ASUS webpage and download the network driver for the motherboard.

Once downloaded, I just extract the drivers and put them in a folder where I can find it. The driver it self that we want to inject into WinPE is the .INF file but the actual name can differ a bit. Its here we you just need to test your way forward to figure out which driver it is you actually need.

Now we need to head back to our “Deployment and Imaging Tools Environment” and run the following commands. remember to change the file path and name of the actual driver in the example below.
copype amd64 C:\winpe_amd64_win10

Dism /Mount-Image /ImageFile:"C:\winpe_amd64_win10\media\sources\boot.wim" /index:1 /MountDir:"C:\winpe_amd64_win10\mount"

Dism /Add-Driver /Image:"C:\winpe_amd64_win10\mount" /Driver:"C:\temp\WinPE\DRV_LAN_Intel_I219\e1d68x64.inf"

Dism /Unmount-Image /MountDir:"C:\winpe_amd64_win10\mount" /commit

makewinpemedia /iso C:\winpe_amd64_win10 C:\winpe_amd64_win10\WinPE.iso


Network share for the Windows Installation
We need to be able to reach the Installation media from the network, to do this we need the content to be on a network share that you can access. In my own environment I have a network share where I have select the media I want. the Installation media needs to have all the files that comes from the Windows ISO you downloaded from Microsoft.


Installation of Windows
From WinPE we need to connect to the network share with the help of net use. You need to change the IP or DNS-name in the example below and navigate to your setup.exe file on your networks share.
net use s: \\192.168.2.61\OSD
S:
CD "Upgrade package"
Setup.exe


Just wait for the Installation to finish and there you have it. this is how we can use the Virtual Image capabilities with TinyPilot Pro together with WinPE to be able to Install Windows.

That’s it for this time, Don’t forget to follow me on twitter @timmyitdotcom
One comment