

There will come a day when something isn’t working as it should any more, when that day arrives we have to be able to estimate the situation and also preparing to do the necessary action to solve it. A big part of our job as administrators is to solve problems and come up with solutions. One important thing to always consider when troubleshooting something is if there’s another way to achieve the same result but in a different way then what just broke, finding a temporary workaround until you figured out what the actual cause of the problem is and how to fix it.
In this scenario we are playing with the idea that ADR is broke or just that Endpoint protection definitions aren’t being deployed successfully any more and after some brief troubleshooting one realize that i will probably take some time until the cause of the problem is found. What do you do in the mean time?
Goal
We wan’t to have a alternative way of being able to get the latest Endpoint Protection definitions and deploy them to all the machines needed on a set schedule so we can get the same result as if the ordinary Definition deployment was working properly. We will do this with the help of ConfigMgr, Powershell and Schedule Task’s.
In ConfigMgr we will make a package containing the latest definition being deploy and with Powershell we will get the latest definitions and then update the package source files when there’s new one and we will make a Schedule task for this Powershell script to 3 times a day, every 8 hours.
The Script
# Configuration and variables

[String]$SourcePath = "D:\Packages\Endpoint Definitions"
$DeploymentPackage = ("Endpoint Definition Delta x64" ,"Endpoint Definition Delta x86")

[String]$FullDefExe = "mpam-fe.exe"
[String]$DeltaDefExe = "mpam-d.exe"
[String]$NisDefExe = "nis_full.exe"

[String]$SCCMmodule = "D:\program Files\Microsoft Configuration Manager\AdminConsole\bin\ConfigurationManager.psd1"
Import-Module $SCCMmodule
# Creating folder structure

$Allpaths = "$Sourcepath\x64\Full", "$Sourcepath\x64\Delta", "$Sourcepath\x64\Nis", "$Sourcepath\x86\Full", "$Sourcepath\x86\Delta", "$Sourcepath\x86\Nis"
Foreach ($Paths in $Allpaths)
{
If (Test-Path "$Paths")
{}
Else
{New-Item -Path $Paths -ItemType Directory}
}

# Downloading Updates

$Fullx64 = ("http://go.microsoft.com/fwlink/?LinkID=121721&clcid=0x409&arch=x64", "$($SourcePath)\x64\Full\$FullDefExe")
$Deltax64 = ("http://go.microsoft.com/fwlink/?LinkId=211054", "$($SourcePath)\x64\Delta\$DeltaDefExe")
$Nisx64 = ("http://go.microsoft.com/fwlink/?LinkId=197094", "$($SourcePath)\x64\Nis\$NisDefExe")

$Fullx86 = ("http://go.microsoft.com/fwlink/?LinkID=121721&clcid=0x409&arch=x86", "$($SourcePath)\x86\Full\$FullDefExe")
$Deltax86 = ("http://go.microsoft.com/fwlink/?LinkId=211053", "$($SourcePath)\x86\Delta\$DeltaDefExe")
$Nisx86 = ("http://go.microsoft.com/fwlink/?LinkId=197095", "$($SourcePath)\x86\Nis\$NisDefExe")

$WebClient = New-object System.Net.WebClient

$WebClient.DownloadFile($Fullx64[0], $Fullx64[1])
$WebClient.DownloadFile($Fullx86[0], $Fullx86[1])

$WebClient.DownloadFile($Deltax64[0], $Deltax64[1])
$WebClient.DownloadFile($Deltax86[0], $Deltax86[1])

$WebClient.DownloadFile($Nisx64[0], $Nisx64[1])
$WebClient.DownloadFile($Nisx86[0], $Nisx86[1])

#Update distrubution point with latest patches, don't forget to modify the Set-location to the correct Site code

Set-Location TS1:

Foreach ($Package in $DeploymentPackage)
{
Update-CMDistributionPoint -PackageName $Package
}
WordPress is messing with me and I’m not sure why. WP is adding what it looks like HTML characters to the variables containing URL’s “<a href=“but that’s only when i post the full script. Under the dissecting part it doesn’t. The characters does not appear in the in the Text editor at all. This is not the first time WP is adding unwanted characters in the code snippets but generally they appear while editing and can be removed manually but this time the chars doesn’t show up until its published and i cant remove it. If anyone have an idea how to fix this please let me know.
Here’s the code in plain text
$Fullx64 = ("http://go.microsoft.com/fwlink/?LinkID=121721&clcid=0x409&arch=x64", "$($SourcePath)\x64\Full\$FullDefExe")
$Deltax64 = ("http://go.microsoft.com/fwlink/?LinkId=211054", "$($SourcePath)\x64\Delta\$DeltaDefExe")
$Nisx64 = ("http://go.microsoft.com/fwlink/?LinkId=197094", "$($SourcePath)\x64\Nis\$NisDefExe")

$Fullx86 = ("http://go.microsoft.com/fwlink/?LinkID=121721&clcid=0x409&arch=x86", "$($SourcePath)\x86\Full\$FullDefExe")
$Deltax86 = ("http://go.microsoft.com/fwlink/?LinkId=211053", "$($SourcePath)\x86\Delta\$DeltaDefExe")
$Nisx86 = ("http://go.microsoft.com/fwlink/?LinkId=197095", "$($SourcePath)\x86\Nis\$NisDefExe")
Dissecting the script
We start out with these 2 variable’s you need to modify-
$DeploymentPackage you need change to the name of the Package you created that will be deployed (but you need to download the files before you create your package. More on that in the examples section)
$SourcePath is the actual path the source files. You just need to create the root folder and the script will create the rest.
$DeploymentPackage = ("Endpoint Definition Delta x64" ,"Endpoint Definition Delta x86")
[String]$SourcePath = "D:\Packages\Endpoint Definitions"
Next section needs only 1 change and thats
$SCCMmodule and that’s the path where you have installed SCCM and point to the ConfigurationManager.psd1 file that contains all the SCCM 2012 Powershell cmdlets.
[String]$FullDefExe = "mpam-fe.exe"
[String]$DeltaDefExe = "mpam-d.exe"
[String]$NisDefExe = "nis_full.exe"

[String]$SCCMmodule = "D:\program Files\Microsoft Configuration Manager\AdminConsole\bin\ConfigurationManager.psd1"
Import-Module $SCCMmodule
Next up is the creation of the sub folders in the source path you specified earlier in the $SourcePath variable and here’s no need for modification.
# Creating folder structure

$Allpaths = "$Sourcepath\x64\Full", "$Sourcepath\x64\Delta", "$Sourcepath\x64\Nis", "$Sourcepath\x86\Full", "$Sourcepath\x86\Delta", "$Sourcepath\x86\Nis"
Foreach ($Paths in $Allpaths)
{
If (Test-Path "$Paths")
{}
Else
{New-Item -Path $Paths -ItemType Directory}
}
The following section downloads the definitions to the correct folder.
$Fullx64 = ("http://go.microsoft.com/fwlink/?LinkID=121721&clcid=0x409&arch=x64", "$($SourcePath)\x64\Full\$FullDefExe")
$Deltax64 = ("http://go.microsoft.com/fwlink/?LinkId=211054", "$($SourcePath)\x64\Delta\$DeltaDefExe")
$Nisx64 = ("http://go.microsoft.com/fwlink/?LinkId=197094", "$($SourcePath)\x64\Nis\$NisDefExe")

$Fullx86 = ("http://go.microsoft.com/fwlink/?LinkID=121721&clcid=0x409&arch=x86", "$($SourcePath)\x86\Full\$FullDefExe")
$Deltax86 = ("http://go.microsoft.com/fwlink/?LinkId=211053", "$($SourcePath)\x86\Delta\$DeltaDefExe")
$Nisx86 = ("http://go.microsoft.com/fwlink/?LinkId=197095", "$($SourcePath)\x86\Nis\$NisDefExe")

$WebClient = New-object System.Net.WebClient

$WebClient.DownloadFile($Fullx64[0], $Fullx64[1])
$WebClient.DownloadFile($Fullx86[0], $Fullx86[1])

$WebClient.DownloadFile($Deltax64[0], $Deltax64[1])
$WebClient.DownloadFile($Deltax86[0], $Deltax86[1])

$WebClient.DownloadFile($Nisx64[0], $Nisx64[1])
$WebClient.DownloadFile($Nisx86[0], $Nisx86[1])
and the last step will update the distribution point with the latest files that’s been downloaded. Dont for get to modifie the Set-location to your sitecode.
Set-Location TS1:

Foreach ($Package in $DeploymentPackage)
{
Update-CMDistributionPoint -PackageName $Package
}
Example
Here i will go through all the steps necessary to setup and make this work.
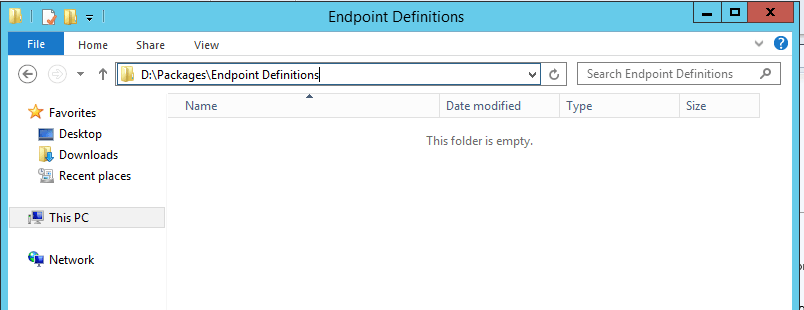
Start with creating your empty source folder
Then Run this part of the script and modify the $SourcePath variable to the empty source folder you just created and dont forget to change the $SCCMmodule variable to the path where you have ConfigMgr installed
If you want to see which the latest definitions are you can do that here https://www.microsoft.com/security/portal/definitions/whatsnew.aspx
# Configuration and variables
$DeploymentPackage = ("Endpoint Definition Delta x64" ,"Endpoint Definition Delta x86")
[String]$SourcePath = "D:\Packages\Endpoint Definitions"

[String]$FullDefExe = "mpam-fe.exe"
[String]$DeltaDefExe = "mpam-d.exe"
[String]$NisDefExe = "nis_full.exe"

[String]$SCCMmodule = "D:\program Files\Microsoft Configuration Manager\AdminConsole\bin\ConfigurationManager.psd1"
Import-Module $SCCMmodule


# Creating folder structure and downloading files

$Allpaths = "$Sourcepath\x64\Full", "$Sourcepath\x64\Delta", "$Sourcepath\x64\Nis", "$Sourcepath\x86\Full", "$Sourcepath\x86\Delta", "$Sourcepath\x86\Nis"
Foreach ($Paths in $Allpaths)
{
If (Test-Path "$Paths")
{}
Else
{New-Item -Path $Paths -ItemType Directory}
}
# Downloading Updates
$Fullx64 = ("http://go.microsoft.com/fwlink/?LinkID=121721&clcid=0x409&arch=x64", "$($SourcePath)\x64\Full\$FullDefExe")
$Deltax64 = ("http://go.microsoft.com/fwlink/?LinkId=211054", "$($SourcePath)\x64\Delta\$DeltaDefExe")
$Nisx64 = ("http://go.microsoft.com/fwlink/?LinkId=197094", "$($SourcePath)\x64\Nis\$NisDefExe")

$Fullx86 = ("http://go.microsoft.com/fwlink/?LinkID=121721&clcid=0x409&arch=x86", "$($SourcePath)\x86\Full\$FullDefExe")
$Deltax86 = ("http://go.microsoft.com/fwlink/?LinkId=211053", "$($SourcePath)\x86\Delta\$DeltaDefExe")
$Nisx86 = ("http://go.microsoft.com/fwlink/?LinkId=197095", "$($SourcePath)\x86\Nis\$NisDefExe")

$WebClient = New-object System.Net.WebClient

$WebClient.DownloadFile($Fullx64[0], $Fullx64[1])
$WebClient.DownloadFile($Fullx86[0], $Fullx86[1])

$WebClient.DownloadFile($Deltax64[0], $Deltax64[1])
$WebClient.DownloadFile($Deltax86[0], $Deltax86[1])

$WebClient.DownloadFile($Nisx64[0], $Nisx64[1])
$WebClient.DownloadFile($Nisx86[0], $Nisx86[1])
When that’s done the source folder should me populated with the different Definitions

If you want both x86 and x64 definitions create 2 packages and in this example I’m just planing to deploy the delta definitions

Next step is to make a Custom interval under scheduling to this packages will run every 12 hours.

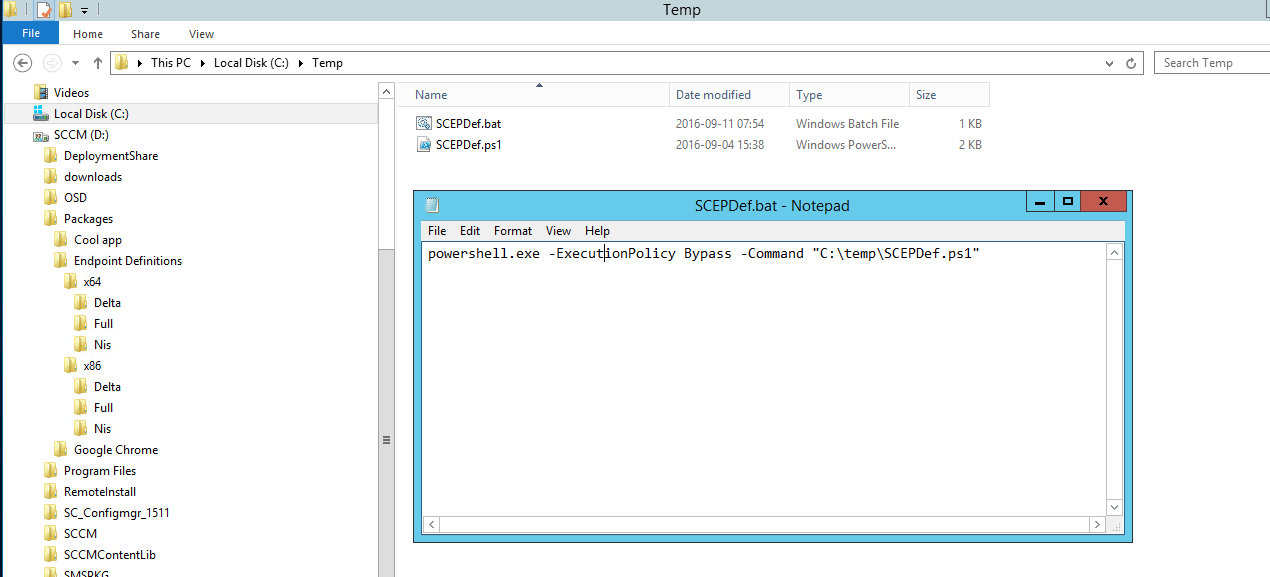
Next up is to create a schedule task that will run the powershell script so we can get the latest definitions and update the package in SCCM, but before we do that we will create a .BAT script that we will let the schedule task trigger that will trigger the powershell script this is because in my own experience, trigger a powershell script directly from schedule task is a bit iffy and it’s just more reliable to trigger a bat script that triggers the powershell script.
I will create the BAT script in C:\temp where i aslo have my Powershell script and make it execute the following command
powershell.exe -ExecutionPolicy Bypass -Command "C:\temp\SCEPDef.ps1"
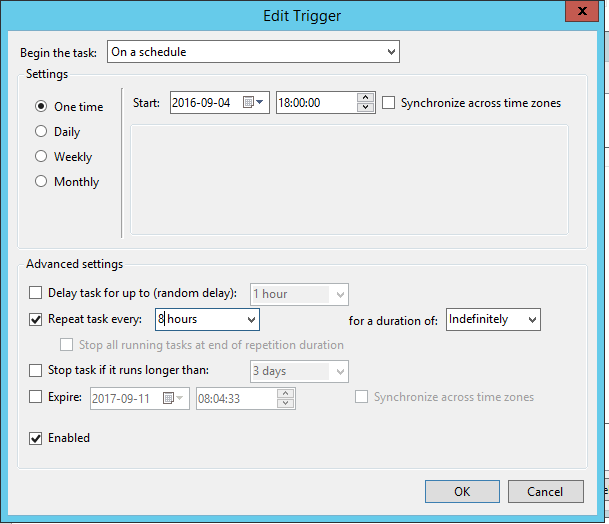
Now lets go to the Task scheduler and create an advanced task that will run every 8 hours so we always have the latest definitions since Microsoft releases new definitions 3 times a day.
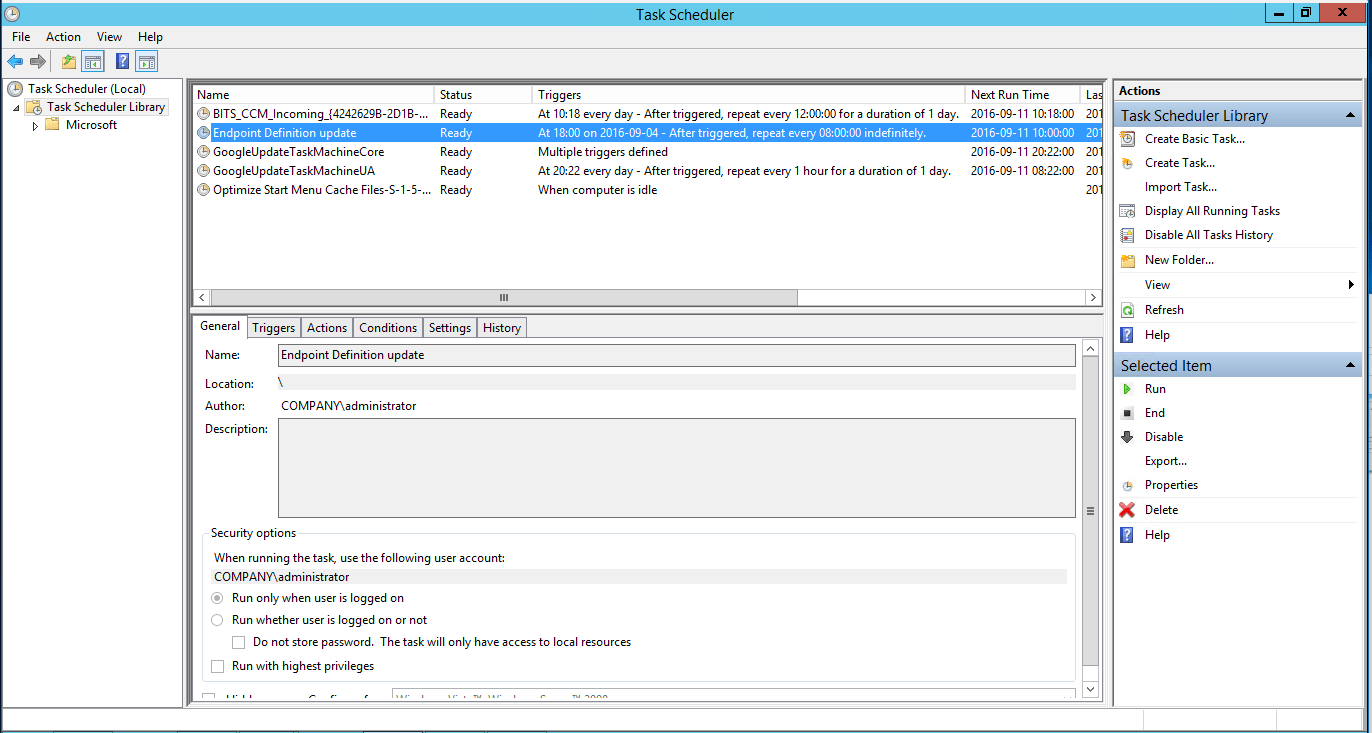
Triggers will be
And Actions will trigger the .Bat script we created earlier

after that we are pretty much set, don’t forget to point the source files on the package to the correct directory of the definition you want to deploy and you do this by right clicking on the package and choose properties.


After all of this you can just Run the schedule task for the first time and it will download the latest definitions and update the distribution points with the latest files and it will continue to do that every time the schedule task runs. If you have the Configuration Manager R2 toolkit installed you can check this with the content library explorer as seen below and if you look at the Time modified column you can compare that date on the actual files in the Source folder and you can see which file is on the distribution point.


This is all for now and i hope this can come in handy for someone out there. If you liked this post or might now someone who might would then feel free to share this post.
Cheers Timmy.
You can find me over at
[twitter-follow screen_name=’Timmyitdotcom’]
One comment