
Content
This is the introduction
Welcome back to another blog post and today I will cover how to deploy .Dot 3.5 from Intune.
There could be many reason for why we want to deploy any version of .Net to our Windows devices but the most frequent one I encounter is that there’s still a lot of applications requiring version 3.5 and Windows 10 does not come with that pre-installed.
Togehter with the new feature in Intune to set dependencies on Win32 apps we are now able to
deploy .Net as a dependency so we no longer have to include .Net in all of our applications that requires it.
Prereqs
To make this all happen we have few things, first of all .Net 3.5 then we need a custom Installation script which is provided below and then we need to convert it to a .Intunewim file.
.Net 3.5
We have 2 ways of getting the .Net 3.5 content to the client In this scenario. We will be using the Enable-WindowsOptionalFeature powershell cmdlet and we can either specify a source path for the .cab files. Instead of adding the source files to the installation package we can also just let each machine get the content directly from Microsoft.
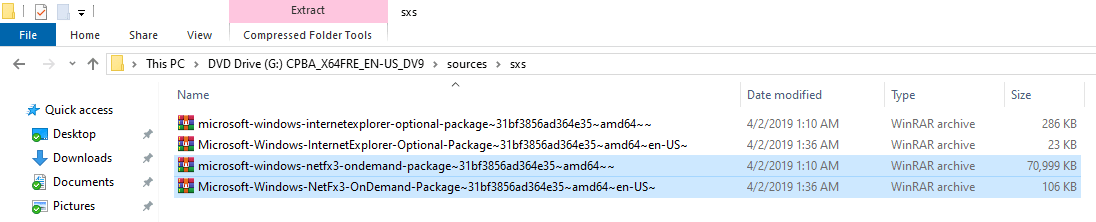
If you have a Win10 ISO you can get the .NET 3.5 cab-files from the SXS folder. Mount the Win10 ISO and navigate to sources\sxs and copy the 2 files that contains netfx3 in the name.
You could also download the .Net 3.5 from Microsoft and that will get you the .EXE installer. But in this post I wont cover installing the .EXE mainly because I have had mixed result using the .EXE.
https://www.microsoft.com/en-us/download/details.aspx?id=25150

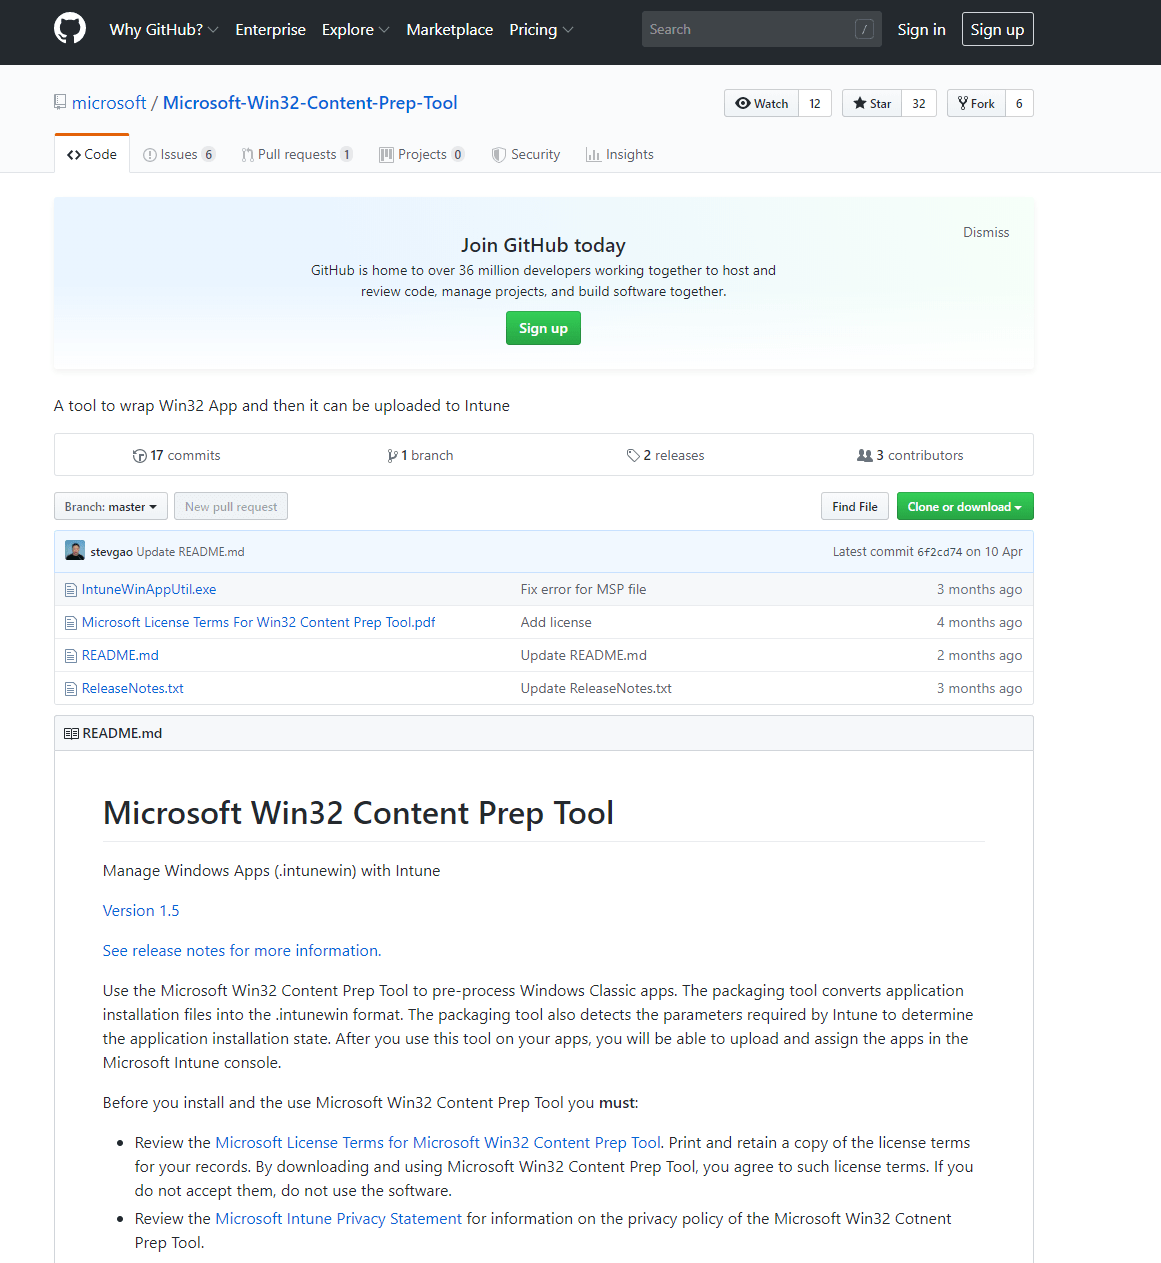
Microsoft Win32 Content Prep Tool
the Win32 content prep tool is needed to create our .Intunewim file that we will upload to Intune later.
Start with heading over to github and download the tool
To download the Win32 content prep tool head over to https://github.com/Microsoft/Microsoft-Win32-Content-Prep-Tool
Creating our application and deployment
The next step is to start putting it all togheter.
Creating our Installation script
Here’s the powershell Installation script we will use, this will invoke the installation or uninstall depending on what we parameter we call the script. This will make us be able to both do Install and uninstall with Intune.
Im also including logic In the script to check if the .Net content already exist in the Win32 app package, if the folder sxs exist and inside at least one NetFx3 cab-file is present it will run the DISM command and point to that source. If the files and folder does’t exist it will run Enable-WindowsOptionalFeature withouth the /source parameter which means that the computer will go to Windows update and get the files needed.
More info about DISM here https://docs.microsoft.com/en-us/windows-hardware/manufacture/desktop/deployment-image-servicing-and-management–dism–command-line-options
Param(
[Parameter(Mandatory=$true)]
[ValidateSet("Install", "Uninstall")]
[String[]]
$Mode
)

If ($Mode -eq "Install")

{
if (Test-path .\sxs\Microsoft-Windows-NetFx3-OnDemand-Package*.cab)
{
#Offline Installer
Enable-WindowsOptionalFeature -Online -FeatureName 'NetFx3' -Source .\sxs\ -NoRestart -LimitAccess

}
else
{
#Online installer
Enable-WindowsOptionalFeature -Online -FeatureName 'NetFx3' -NoRestart
}

}

If ($Mode -eq "Uninstall")

{

Disable-WindowsOptionalFeature -Online -FeatureName 'NetFx3' -Remove -NoRestart

}
Creating our .wintunewim file
Create a new folder called dotnet35 and copy in the script Install.ps1 and also include the SXS folder with the .Net 3.5 cab-files if you want to use local source installation and be able to take advantage of Delivery Optimization otherwise
skip the SXS folder.


Run the IntuneWinAppUtil.exe from the Microsoft Win32 Content Prep Tool that you downloaded earlier, follow the instructions and create the .Intunewim file


Deploy our application with Intune
If you havent deployed a Win32 app before in Intune I recommend you check out the documentation from Microsoft here https://docs.microsoft.com/en-us/intune/apps-win32-app-management
I won’t go through all the steps in detail in this post on how to create a Win32 app but instead I’ll just go through the most important parts of Install / Uninstall and detection method.

The installation and uninstall command we will be using looks like this
powershell.exe -ExecutionPolicy Bypass -file Install.ps1 -Mode Install
powershell.exe -ExecutionPolicy Bypass -file Install.ps1 -Mode Uninstall

And for detection method I’m just looking for a registry key
HKEY_LOCAL_MACHINE\SOFTWARE\Microsoft\.NETFramework\v3.0

We have now created our Win32 app and can set other Win32 apps having .Net 3.5 as a dependency or assign it directly to any user or device we want.
On the client side, if we have toast notification turned on for the deployment we will see that the Win32 app get installed.

Leave a comment or question in the comment section below.
That’s all for now and until next time, cheers !
And you can also find me blogging over at http://blog.ctglobalservices.com/
Hi Timmy, thanks for a great post it works as expected – do you know which command we could use to enable the child/sub features of .net 3.5? Tried with -IncludeAllSubFeature but do not work…
Well i dont know why but when adding Win32 app in Intune and uploading .intunewin file – nothing happens.
Hi Olegs… I recently had the same experience, and after a bit of troubleshooting in my case it seems that the source cab files must match the OS that you’re installing on… 1809 cab files must install on 1809. I had 1909 cab files, and they wouldn’t install on 1809. So I’ve now expanded on the powershell above to grab the OS version and will include cabs from all the OSs I want to support and automatically use the appropriate ones depending on the OS it’s installing on. Hopefully that’ll solve it.
Hi guys, wondering if the powershell script requires any modifying when creating specifically the “Test path” section. I’m trying the installation but getting a failed attempt every time when applying your steps outlined for Win10 version 20H2.
Hi Steve,
I am observing the same challenge and the problem is .NET is a prereq of SAP and we have different Win versions
i.e. 1909, 2004 or 20H2, what logic to use to differentiate in the packages via Intune and secondly Intune give a OS version to select to install while app deployment. any suggestions shall be grateful
Same here, we are currently having issues with this script on 20H2 as well
I tried this out, and it worked like a charm, and i even made dependencies on it and it worked really well.
Thanks
Hi, what do we need to change in our script parameters if we need to deploy .NET 4.8?
I was getting some issue depending of the OS version. I modified the script and now works like a charm! Get the cab file on the corresponding ISO.
Param(
[Parameter(Mandatory=$true)]
[ValidateSet(“Install”, “Uninstall”)]
[String[]]
$Mode
)
$currentWU = Get-ItemProperty -Path “HKLM:\SOFTWARE\Policies\Microsoft\Windows\WindowsUpdate\AU” -Name “UseWUServer” | select -ExpandProperty UseWUServer
$WinVer = (Get-WmiObject -class Win32_OperatingSystem).Version
If ($Mode -eq “Install”) {
#Offline Installer
#Win 20xx
if ($WinVer -like ‘10.0.19*’) {
Write-Host “Win 20xx”
Set-ItemProperty -Path “HKLM:\SOFTWARE\Policies\Microsoft\Windows\WindowsUpdate\AU” -Name “UseWUServer” -Value 0
Restart-Service wuauserv
Enable-WindowsOptionalFeature -Online -FeatureName ‘NetFx3’ -Source .\sxs\2xxx -NoRestart -LimitAccess
Start-Sleep 10
Set-ItemProperty -Path “HKLM:\SOFTWARE\Policies\Microsoft\Windows\WindowsUpdate\AU” -Name “UseWUServer” -Value $currentWU
Restart-Service wuauserv
exit
}
#Win 19xx
if ($WinVer -like ‘10.0.18*’) {
Write-Host “Win 19xx”
Set-ItemProperty -Path “HKLM:\SOFTWARE\Policies\Microsoft\Windows\WindowsUpdate\AU” -Name “UseWUServer” -Value 0
Restart-Service wuauserv
Enable-WindowsOptionalFeature -Online -FeatureName ‘NetFx3’ -Source .\sxs\19xx -NoRestart -LimitAccess
Start-Sleep 10
Set-ItemProperty -Path “HKLM:\SOFTWARE\Policies\Microsoft\Windows\WindowsUpdate\AU” -Name “UseWUServer” -Value $currentWU
Restart-Service wuauserv
exit
}
#Win 18xx
if ($WinVer -like ‘10.0.17*’) {
Write-Host “Win 18xx”
Set-ItemProperty -Path “HKLM:\SOFTWARE\Policies\Microsoft\Windows\WindowsUpdate\AU” -Name “UseWUServer” -Value 0
Restart-Service wuauserv
Enable-WindowsOptionalFeature -Online -FeatureName ‘NetFx3’ -Source .\sxs\18xx -NoRestart -LimitAccess
Start-Sleep 10
Set-ItemProperty -Path “HKLM:\SOFTWARE\Policies\Microsoft\Windows\WindowsUpdate\AU” -Name “UseWUServer” -Value $currentWU
Restart-Service wuauserv
exit
}
#Online installer
else {
Write-Host “Online”
Set-ItemProperty -Path “HKLM:\SOFTWARE\Policies\Microsoft\Windows\WindowsUpdate\AU” -Name “UseWUServer” -Value 0
Restart-Service wuauserv
Enable-WindowsOptionalFeature -Online -FeatureName ‘NetFx3’ -NoRestart
Start-Sleep 10
Set-ItemProperty -Path “HKLM:\SOFTWARE\Policies\Microsoft\Windows\WindowsUpdate\AU” -Name “UseWUServer” -Value $currentWU
Restart-Service wuauserv
exit
}
}
#Uninstaller
If ($Mode -eq “Uninstall”) {
Disable-WindowsOptionalFeature -Online -FeatureName ‘NetFx3’ -Remove -NoRestart
exit
}
Unable to get this to work unfortunately.
Any changes need to be made for this to work on Windows 11 PCs?
Thank you Timmy for this post,
below is the script which modified from Timmy script to enable .net 3.5 online.
Param(
[Parameter(Mandatory=$true)]
[ValidateSet(“Install”, “Uninstall”)]
[String[]]
$Mode
)
If ($Mode -eq “Install”)
{
#Online installer
Enable-WindowsOptionalFeature -Online -FeatureName ‘NetFx3’ -NoRestart
}
If ($Mode -eq “Uninstall”)
{
Disable-WindowsOptionalFeature -Online -FeatureName ‘NetFx3’ -Remove -NoRestart
}
Hi all,
The PowerShell script stopped working for us on Windows 11 and we could not find a reason as to why it was failing in the logs.
We reverted to using an intune package with a .cmd batch file and included the sxs folder from the Windows 11 installation media using the below commands:
@Echo Off
::Run .Net 3.5 Dism command
Start /Wait Dism /online /enable-feature /featurename:NetFX3 /All /Source:%~dp0sxs /LimitAccess
For me the Uninstall didn’t work, it showed “Uninstalling” for a few hours now without timing out.
Installation worked well as far as I can tell.