
When working with a client the other day an Interesting situation came up where they had already used Azure AD for a while and now were ready to start using Intune for managing their Windows 10 PC’s. Prior to that they haven’t had any device management like ConfigMgr or Intune before. They also didn’t have any on-prem Active Directory and were only using cloud services like Azure AD and Office 365.
The question that came up was:
How do we enroll existing Windows 10 machines in Azure AD in to Intune and how can we do that with the minimum amount of effort from the end-user?
One of the ways to do it is by enabling the Enable automatic MDM enrollment using default Azure AD credentials policy but the client didn’t want their end-users or admins manually going in and enable that policy on each machine. So the discussion continued on how could me make it easier for the end user to do the things needed to enroll their device. In this post I will cover both the manual of doing it by enabling the policy but this is mainly to give it some context and from their I will show you how it can be done with the help of a provisioning package.
Once you have the provisioning package in place it’s just a matter of delivering it to the end-user in the most simple way possible and let the end-user run the provisioning package.
Enable automatic MDM enrollment using default Azure AD credentials
On all Windows 10 1703 and newer version of Windows there’s a local group policy that can be set to enroll in to MDM using logged on Azure credentials, this comes in handy in a 1 to 1 scenario where the end-user has their dedicated devices. If you have on-prem AD you can create a GPO for this policy but in this example we don’t have an on-prem AD.
Microsoft documentation can be found here:
On the local machine, go to the Windows 10 start menu and search for “Edit group policy” and open it up with Administrative privileges.

Navigate to to Computer Configuration -> Administrative Templates -> Windows Components -> MDM and open up Enable automatic MDM enrollment using default Azure AD credentials and choose “Enable” and click on “Apply” and “Ok”

Once’s this is done 2 things happens,
This registry key gets created
HKLM:\SOFTWARE\Policies\Microsoft\Windows\CurrentVersion\MDM\AutoEnrollMDM = 1
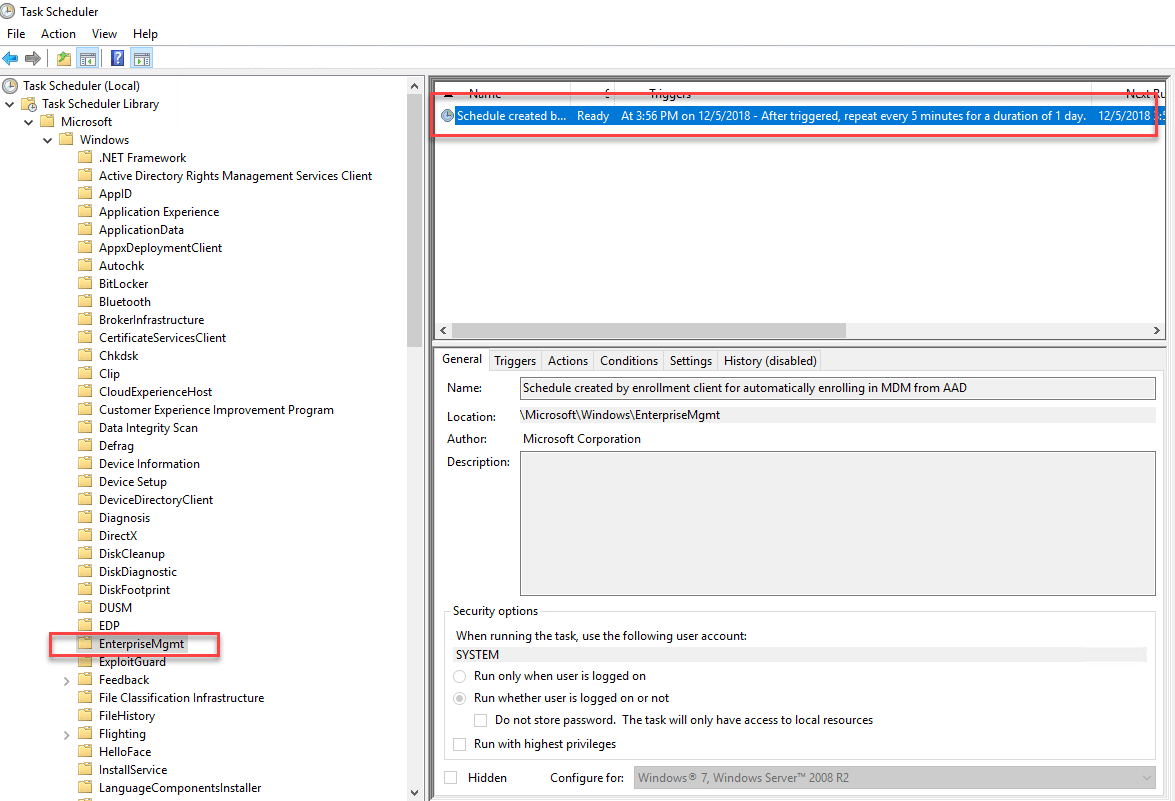
And a schedule task gets created by the name of “Schedule created by enrollment client for automatically enrolling in MDM from AAD” which can be found in the task scheduler under
Microsoft -> Windows -> EnterpriseMgmt
Logs and Monitoring
Once the everything is in place you can monitor the process in Event Viewer
From my own testing and experience you will see the following Error message “Auto MDM Enroll Failed (Unknown Win32 Error code 0x8018002b)” for a couple of hours but that’s totally normal and nothing to worry about.

In this specific example it took about 5 hours before it succeeded to do the MDM join and during this time a user was logged on to the machine. If the machine has no user logged on to it or its put to sleep or turned off the MDM join won’t happen.

Windows 10 provisioning package and Windows Configuration Designer
As mentioned earlier in this post if you have on-prem AD you can create a GPO for this policy an roll out it that way. But if you have no on-prem infrastructure at all to we have to find a easy way for the end-user so we can MDM join them without having to manually go in to local policy and enable the policy.
Microsoft documentation on Provisioning package and Windows Configuration Designer can be found here:
Side note.
In Windows Configuration Designer you are able to something called ADMXIngestion where you can inject ADMX files and configure their settings however I haven’t been able to get that to work when it comes to the MDM policy and its ADMX file. I’m not exactly sure why and while I’m trying to solve that I will instead focus this post on how to get around it and create the same settings as the policy does but with a powershell script instead.
Once you installed Windows Configuration Designer from either the Windows ADK or Microsoft Store it’s time to create the provisioning package we are about to use but to make this work.
We also need a powershell script and a .bat file that calls the powershell script within the provisioning package because there are some challenges when it comes to running powershell scripts directly.
The scripts
In this example we will be using MDMPS.ps1 as our powershell script and MDM.bat
With powershell we create a registry key and a Schedule task which is the same schedule task that runs if one manually enables the MDM join policy on the local computer.
.NOTES
===========================================================================
Created on:    12/12/2018
Modified on:   12/12/2018
Created by:    Timmy Andersson
Twitter:       @TimmyITdotcom
Blog:          www.timmyit.com & https://blog.ctglobalservices.com/author/tan/
===========================================================================
.DESCRIPTION
MDM Join script. Creates a registry key and a schedule task to start the process to MDM join a computer.
===========================================================================

Begin{

$RegKey ="HKLM:\SOFTWARE\Policies\Microsoft\Windows\CurrentVersion\"
$RegKey1 ="HKLM:\SOFTWARE\Policies\Microsoft\Windows\CurrentVersion\MDM"
$ScheduleName ="Schedule created by enrollment client for automatically enrolling in MDM from AAD"
$Date = Get-Date -Format "yyyy-MM-dd"
$Time = (Get-date).AddMinutes(5).ToString("HH:mm:ss")

$ST = @"
<?xml version="1.0" encoding="UTF-16"?>
<Task version="1.3" xmlns="http://schemas.microsoft.com/windows/2004/02/mit/task">
  <RegistrationInfo>
    <Author>Microsoft Corporation</Author>
    <URI>\Microsoft\Windows\EnterpriseMgmt\Schedule created by enrollment client for automatically enrolling in MDM from AAD</URI>
    <SecurityDescriptor>D:P(A;;FA;;;BA)(A;;FA;;;SY)(A;;FRFX;;;LS)</SecurityDescriptor>
  </RegistrationInfo>
  <Triggers>
    <TimeTrigger>
      <Repetition>
        <Interval>PT5M</Interval>
        <Duration>P1D</Duration>
        <StopAtDurationEnd>true</StopAtDurationEnd>
      </Repetition>
      <StartBoundary>$($Date)T$($Time)</StartBoundary>
      <Enabled>true</Enabled>
    </TimeTrigger>
  </Triggers>
  <Principals>
    <Principal id="Author">
      <UserId>S-1-5-18</UserId>
      <RunLevel>LeastPrivilege</RunLevel>
    </Principal>
  </Principals>
  <Settings>
    <MultipleInstancesPolicy>Queue</MultipleInstancesPolicy>
    <DisallowStartIfOnBatteries>false</DisallowStartIfOnBatteries>
    <StopIfGoingOnBatteries>false</StopIfGoingOnBatteries>
    <AllowHardTerminate>true</AllowHardTerminate>
    <StartWhenAvailable>true</StartWhenAvailable>
    <RunOnlyIfNetworkAvailable>true</RunOnlyIfNetworkAvailable>
    <IdleSettings>
      <StopOnIdleEnd>false</StopOnIdleEnd>
      <RestartOnIdle>false</RestartOnIdle>
    </IdleSettings>
    <AllowStartOnDemand>true</AllowStartOnDemand>
    <Enabled>true</Enabled>
    <Hidden>false</Hidden>
    <RunOnlyIfIdle>false</RunOnlyIfIdle>
    <DisallowStartOnRemoteAppSession>false</DisallowStartOnRemoteAppSession>
    <UseUnifiedSchedulingEngine>true</UseUnifiedSchedulingEngine>
    <WakeToRun>false</WakeToRun>
    <ExecutionTimeLimit>PT1H</ExecutionTimeLimit>
    <Priority>7</Priority>
  </Settings>
  <Actions Context="Author">
    <Exec>
      <Command>%windir%\system32\deviceenroller.exe</Command>
      <Arguments>/c /AutoEnrollMDM</Arguments>
    </Exec>
  </Actions>
</Task>

"@

}
Process
{

New-Item -Path $RegKey -Name MDM
New-ItemProperty -Path $RegKey1 -Name AutoEnrollMDM -Value 1

(Register-ScheduledTask -XML $ST -TaskName $ScheduleName -Force) | Out-null

}
Bat file executing the powershell script from the provisioning package
powershell.exe -noprofile -executionpolicy bypass -Command "'%~dpn0PS.ps1'"
Putting it all together
Start with saving the powershell script and the .bat file. Once’s thats done open up Windows Configuration Designer and under the create section click on “Advanced provisioning”

Select “All Windows desktop editions“

In the next step just click on “Finish” there’s no need to import a provisioning package.


Navigate to Runtime Settings -> ProvisioningCommands -> DeviceContext -> CommandFiles
Click on “Browse” and find the .PS1 script file and click on “Add” repeat this for the .Bat file as well.

You should now see the 2 added files under CommandFiles. In this example the MDMPS is the powershell script and MDM is the .Bat script.

Next thing is to click on “CommandLine” and add write “cmd.exe /c MDM.bat” this will tell the provisioning pack to run the .bat file and the .bat file will run the powershell script.

Now we just need to export the provisioning pack and to do so you click on “Export -> Provisioning package” in the top left corner

Give the provisioning package a name and click on “Next“

You can encrypt the package or sign it with a certificate if you want, but since there’s no unique/sensitive or secret information in this specific package you don’t need to do this. Click “Next“

Choose the path where you want to save your provisioning package to and click on “Next”

Click “Build“

On the last page click on “Finish“

Go the file location where you save the file and grab your newly created provisioning package

Applying provisioning package
When it comes to distribution there’s not much we can do without any prior management or on-prem AD so with this one solution is to just email the package to the end-users and just write a small guide on how they apply it.
There’s a few different ways of applying a provisioning package but in this example we will cover one way.
The file needs to be present on a Windows 10 1703 or later PC where the end user is logged on with their Azure AD credentials.
Double click on the provisioning package

If UAC is turned on and gives you a popup, click “Yes“

a provisioning package warning will appear if its not signed, Click on “Yes, add it“

And that’s it.
The powershell script will now create the schedule task and create the registry key needed to do the MDM Join. A few hours later the machine will be MDM Joined in the same way if you enabled the policy. For logs for the MDM join see the section Logs and Monitoring in this blog post.
If you want to make sure the provisioning package has been applied you can go to Windows start menu -> Settings -> Account -> Access Work or School -> Add or Remove provisioning package

That’s all for now and until next time, cheers !
Don’t forget to follow me on twitter
[twitter-follow screen_name=’Timmyitdotcom’]
And you can also find me blogging over at http://blog.ctglobalservices.com/
This a little bit of an older blog post but the question I have is regarding the policy setting, “Enable automatic MDM enrollment using default Azure AD Credentials.” What no one seems to talk about (including MS documentation) is that when you select Enabled, you then get a drop-down asking you to Select Credential Type to Use.
In this drop down, you can opt to use the User Credential or the Device Credential.
I can’t find anything conclusive about what selecting one over the other does so I’m hoping you can help shed some light on this or point me to the documentation that discusses it.
Thanks!
This does not work for a standard user, UAC will always block.
I deleted a computer from Intune, and now when I try add show this in Event Viewer:
Automatic MDM Registration: Device Credential (0x0), failed (The system attempted to delete the JOIN for a drive not included.)
0x80070088
Just wanted to thank you for this blog. Our company successfully enrolled over a 1,000 devices into Intune/MDM, but 40 or so would Azure AD Hybrid join but fail to enroll MDM with error “Auto MDM Enroll: Device Credential (0x0), Failed (Unknown Win32 Error code: 0x8018002b)”. I must have read over a 100 blogs on the issue and checked settings a thousand time. Finally after finding your blog I checked the existence of the registry key “HKLM:\SOFTWARE\Policies\Microsoft\Windows\CurrentVersion\MDM” on the affected machines – It’s missing. So even though we have group policy in place to automatically enroll MDM the registry key was just missing on the affected computers. Created registry key and forced an enrollment with C:\Windows\system32\deviceenroller.exe /c /AutoEnrollMDM. Perfect since. Thanks a lot!
Great to hear John and thank you for sharing your finding and hopefully that will help someone in the future if they come across this.
Hi John, Could you please explain the steps, how did you enroll the 1,000 devices into intune/MDM. Actually I also followed this blog, and also enrolled devices in intune but there is one problem in this method. As my device is in azure active directory and not in intune, when I run the provisioning package its not getting enrolled in intune but when I disconnect device from azure active directory and rejoin it then it instantly get enrolled into intune which is not possible for large no. of devices enrollment. Also even after device enrollment there is no changes in group policy. It is same as it was before running provisioning package.
this was amazing thanks this worked hybrid azure ad joined computers who do not connect to vpn and not receiving the gpo to autoenroll mdm. I actually got this working without the provisioning package as we were able to deploy the powershell script and batch file using kace
Timmy,
I’m another happy visitor of this thread. This has just saved me and my team more hours than we can count. Good work sir!
Thank you for sharing!
Hi,
Do you know if the task and regedit value are supposed to be added straight away when you “open” the provisonal package?
For me its not changing anything, adding any tasks or regedit values, not sure if I’m doing something wrong or just need to wait.
I can see the package under, Windows start menu -> Settings -> Account -> Access Work or School -> Add or Remove provisioning package, but thats it.
I also do not get any registry values added. Nothing changes. Just going to create a powershell script and have it run on all machines via RMM system as the provisioning package portion seems to lack a step.
Timmy,
I’ve attempted this over VPN and it failed. MS states that it must be line of sight to AD. Can you think of an alternative so that we can auto-provision without the user having to manually enroll over VPN?
Can auto mdm work if one doesn’t have a hybrid AD environment I just have a Azure AD. we have device already joined just need to add Intune mdm.
Hello, normally its totally easy, migrate Computer from AD to Azure:
0. Licence for M365 to User
1. Connect to Work or School Account
2. Download Company Portal from Microsoft Store
3. Copy your Data to C:\Temp or use Tool
4. Log in with Emailadress
5. Admin in Intune Console -> Device “Private” to “Company” -> save.
what is the difference?
Hi, I know this is an old post, but I find it very useful. However, I have been struggling because the PowerShell script needs to be run with elevated permissions. After thinking a bit I have found that using the following line in the BAT file, everything works like a charm.
powershell.exe -noprofile -executionpolicy bypass start-process powershell -verb runas -ArgumentList ‘”-file “%~dpn0PS.ps1″”‘
I hope this helps any other people.
Thanks for sharing !
Is there anything that triggers the scheduled task to stop running or delete? Looks like even after the device has already joined to Intune, the scheduled task keeps running every 5 minutes. Seems this is unnecessary consumption of cpu, memory, bandwidth, etc.
Oops, I notice the scheduled task is only configured to run for 1 day. Nevermind!
Hello!
Like others, I’m really pleased I found this guide, thanks Tim!
I’ve created a provisioning package as described and handed to my test user – a developer. His device is connected to InTune and AzureAD, but Azure isn’t synching properly. There’s a differ between check in date and activity of a couple of months!
However, when running we get:
“MDM Declared Configuration: Function (checkNewInstanceData) operation (Read isNewInstanceData) failed with (The parameter is incorrect.)”
Any thoughts on what’s going on here?
Many thanks
Andrew